As long as I can remember I’ve learned better by doing. Setting up Het Security Office is not an exception, and since I preach security as code I wanted not just to setup another WordPress blog.
My requirements were something:
- that is fully automated. Note: some would consider this overkill!
- that requires zero maintenance of infrastructure
- that is secure by design
- that scales forever
- low cost at high traffic volumes
My requirements resulted in the following choices:
- A static website - this will reduce the attack surface significantly.
- Code will be versioned in a private GitHub repository.
- Committed code changes needed to be automatically deployed.
- Deployments need to be logged and notifications have to be send.
- Content is hosted “serverless” - this will reduce the attack surface further.
- Content is exposed though a Content Delivery Network, for security, scalability and performance.
- HTTPS Only, TLS1.2 with no depreciated cipher suites.
- Access to the website is being logged.
- Infrastructure as code, everything needs to be setup automatically and have zero maintenance.
- Authorisations needed to be role based.
- Secrets, like API, HTTPS certificates and encryption keys need to be automatically managed.
- Hugo CMS to create and manage content.
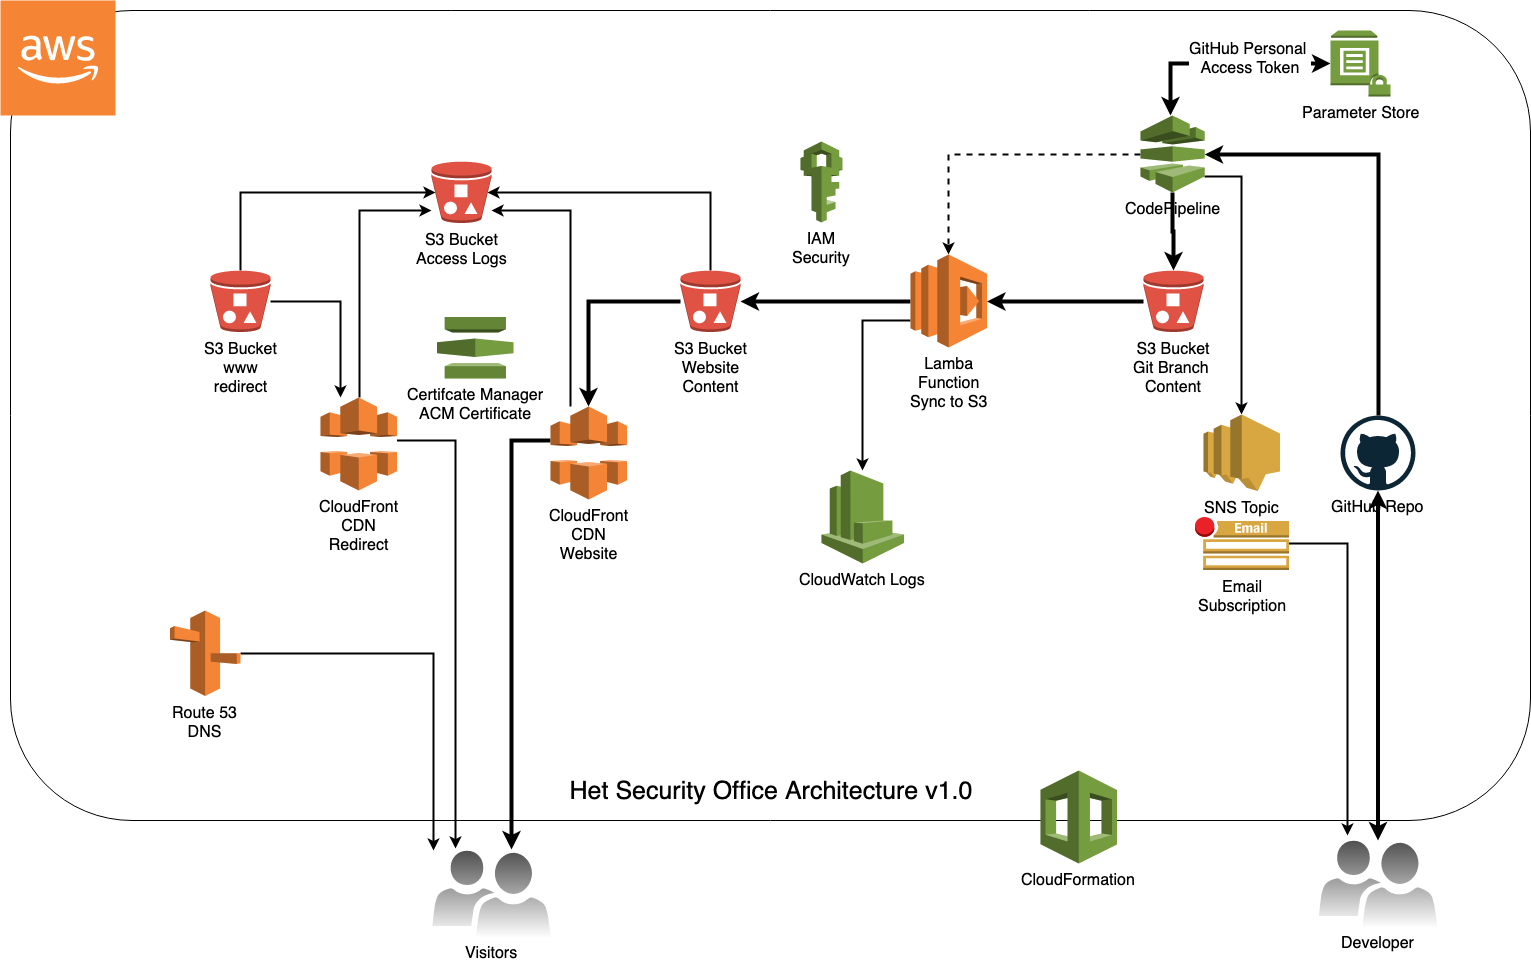
This resulted in the architecture below:

Did I mention some would consider this overkill?
To setup I followed the steps following steps
Prequisites
-
An AWS account with the possibility to pay for their services.
-
A domain name registered in Route 53.
-
aws command line interface installed. See AWS documentation
Your version output can/will differ!aws --version aws-cli/1.16.150 Python/3.7.3 Darwin/19.6.0 botocore/1.12.140 -
aws cli is configured with access credentials. See AWS documentation.
To check:Output of aws sts command will be empty when not configured appropriately.aws sts get-caller-identity { "UserId": "redacted", "Account": "redacted", "Arn": "redacted" } -
A GitHub personal access token with scope (1) Repo and (2) admin:repo_hook that you will only use for AWS CodePipeline. To create one see GitHub documentation.
Let the fun begin!
- Lets store the GitHub personal access token in the AWS Parameter store. For securely managing this secret.
I’ve chosen us-east-1 as my region, although living in Europe because AWS Certificate Manager, which we’ll use to create and manage HTTPS certificates, is only available in this region in combination with the Content Deliver Network (CloudFront).github_token="your scoped GitHub Personal Access Token" github_token_key="GitHubCodePipelinePAT" region=us-east-1 aws ssm put-parameter --name "$github_token_key" --type String \ --value "$github_token" --type String --region=$region unset github_token
Note: for storing the personal access token I would have liked to use SecureString, but at the time of writing this is not supported by CloudFormation - Now that we have stored the GitHub scope personal access token, it is time to spin up the infrastructure. Lets assign values to the used parameters in the CloudFormation template.
And execute the CloudFormation template and get yourself a cup of coffee.
region=us-east-1 domain="your registered domain name" email="your email adres" template="the CloudFormationTemplate" stackname=${domain/./-}-$(date +%Y%m%d-%H%M) source_type=GitHub github_user="your GitHub username" github_repository="the name of your GitHub repository" github_token_key="GitHubCodePipelinePAT"Note: I’ve chosen for e-mail validation of the AWS Certificate Manager certificate. Using DNS validation can take up to several hours which cause the creation of my CloudFormation stack to rollbackaws cloudformation create-stack \ --region "$region" \ --stack-name "$stackname" \ --capabilities CAPABILITY_IAM \ --template-body "file://$template" \ --tags "Key=Name,Value=$stackname" \ --parameters \ "ParameterKey=GeneratorLambdaFunctionS3Bucket,ParameterValue=run.alestic.com" \ "ParameterKey=GeneratorLambdaFunctionS3Key,ParameterValue=lambda/aws-lambda-site-generator-hugo.zip" \ "ParameterKey=DomainName,ParameterValue=$domain" \ "ParameterKey=NotificationEmail,ParameterValue=$email" \ "ParameterKey=SourceType,ParameterValue=$source_type" \ "ParameterKey=GitHubRepository,ParameterValue=$github_repository" \ "ParameterKey=GitHubUser,ParameterValue=$github_user" \ "ParameterKey=GitHubToken,ParameterValue=$github_token_key" echo region=$region stackname=$stackname - The last step is to update the registrar with your hosted zone name servers. To get your hosted zone id do:
Now lets request the name servers for that specific hosted zone id:
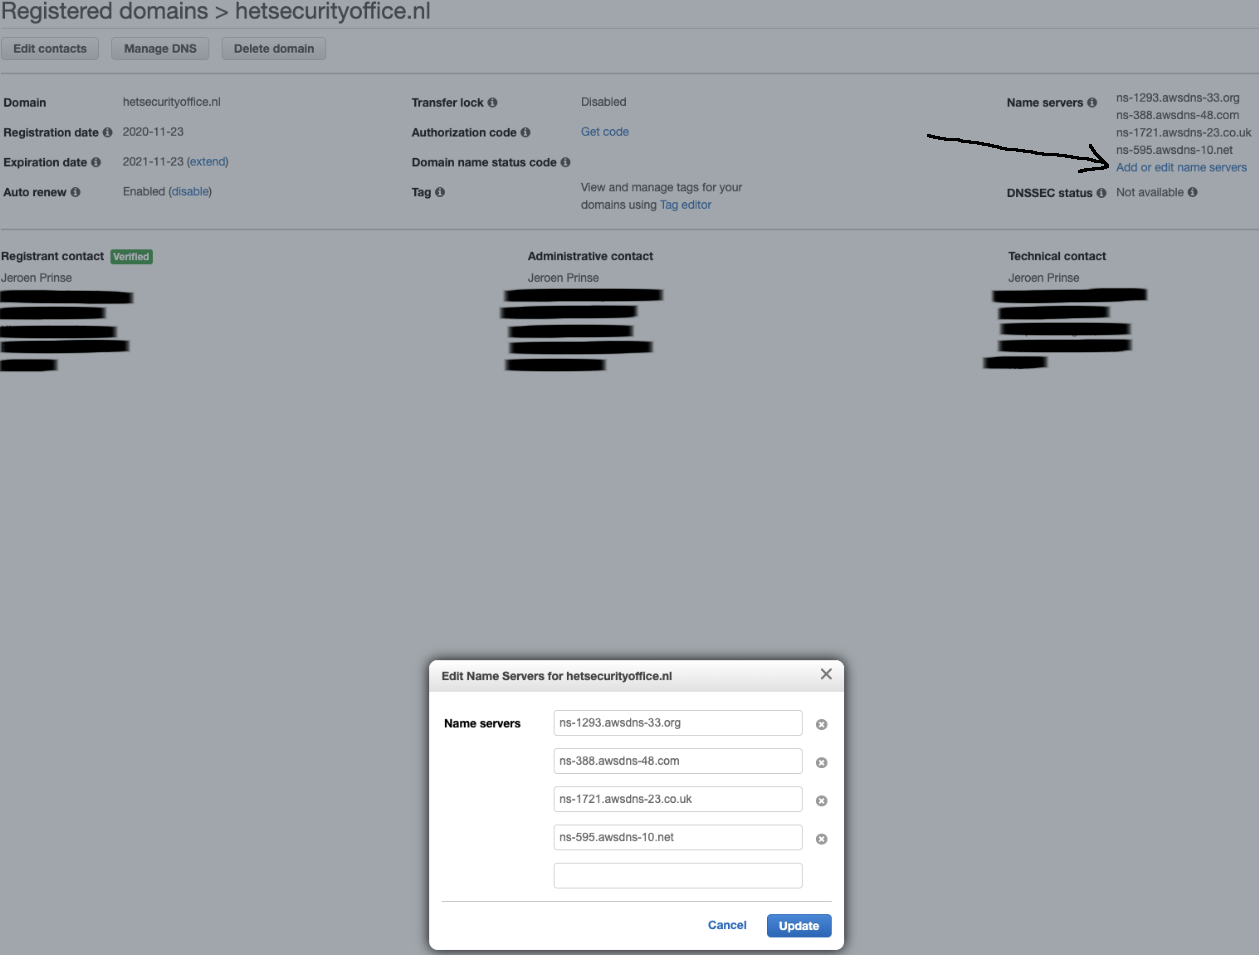
hosted_zone_id=$(aws cloudformation describe-stacks \ --region "$region" \ --stack-name "$stackname" \ --output text \ --query 'Stacks[*].Outputs[?OutputKey==`HostedZoneId`].[OutputValue]') echo hosted_zone_id=$hosted_zone_idYou can now go to your registered domains in AWS. Click on your domain and then click on ‘Add or edit name servers’. Add the name of your name serves (in order) and hit ‘Update’.aws route53 get-hosted-zone \ --id "$hosted_zone_id" \ --output text \ --query 'DelegationSet.NameServers'
You can now commit code to your GitHub repo and it will be automatically deployed.
